Wednesday, August 12, 2009

whole wheat chocolate chip cookies

Ever have one of those days where you just want to sit inside eating raw cookie dough and watching Jon & Kate plus 8? I know I do, and today was just that day.. so that's just what I did.

While I clearly made some cookies, I honestly just wanted the dough. I know some people say that's bad for you but many years of experience has proved otherwise. If it makes you feel any better, you can make these whole wheat chocolate chippers and say "hey, at least they're whole wheat."

So if you're having one of those days.. here's all you need.

  • 2 heaping cups whole wheat flour
  • 1 teaspoon salt
  • 1 teaspoon baking soda
  • 1 stick of butter (1 cup)
  • 1 cup packed brown sugar
  • 1/2 cup granulated sugar
  • 2 large eggs
  • 1 teaspoon pure vanilla extract
  • 1/2 bag (or whatever amount your craving heart desires) of semi-sweet chocolate chips
  • walnuts (optional).. I ended up adding two handfuls to half the cookies
So now to make the cookie dough:

1. Combine the flour, salt, and baking soda in a medium size bowl and set aside.
2. In a larger bowl use an electric mixture to beat softened butter, brown sugar, and granulated sugar together until smooth, around 5 minutes.
3. Add each egg to the sugar mixture one at a time, beating for a minute after the addition of each egg.
4. Add vanilla extract.
5. Add in all the dry ingredients, beating together until all the dry ingredients are mixed in. It will be kind of separated and lumpy, it won't look like your typical dough ball until you form it (where your hands will get dirty).
6. Fold in the chocolate chips and if you want, walnuts.

It will look something like this:


Yum. Now go ahead and take a spoon, spoon up some of this goodness, and roll it into a little ball. Your hands will get dirty so don't try to get around this, just embrace it. Using the spoon is just a little trick to make all the dough balls the same size. It's also another utensil you get to lick clean when you're done with the process.


Now here is where the tough decision making comes in. Do you want to:
A) Just make a bunch of cookie dough balls to freeze
B) Make a bunch of warm gooey cookies OR
C) A bit of both?
Like I said, tough decisions.

If you chose A) Make a bunch of cookie dough balls to freeze: line a baking sheet with wax paper, put your rolled up dough balls on the sheet and leave in the freezer for about 4 hours. You can then take them off the sheet and put them in a freezer bag. This way, if you ever want to make cookies you have the dough handy, or if you're like me.. you'll have the dough handy if you just want some dough.


If you chose B) Make a bunch of warm gooey cookies: preheat oven to 350, place cookies on a greased baking pan with a few inches between each cookie, leaving room for them to rise. Bake for about 8-10 minutes, double check once in a while, taking them out when they seem just ready.

If you chose C) A bit of both, then do a bit of both A) and B). It's like an MCAT question, I know.

Then just sit there eating your cookies watching Jon and Kate and Mystery Diagnosis all day long.

So the Goesselin's are going on Oprah this episode, this is an old one.

Those matching outfits Kate is getting for the kids are so cute.

Those bathing suits are precious.

...Hey, where did my cookie go? Baffling, guess I better go get another.

And that's pretty much how my day went, and that's fine. It was a beautiful summer day in Florida, not even raining.. and I wouldn't have spent it any other way. The cookies are ten times better for you than the sun anyway, really. So...

Eat two and call me in the morning.
-your pre-med chef

Friday, July 24, 2009

banana bread cupcakes

I was at a friend's apartment when she told me she had recently come down with a case of the too-ripe bananas. She showed me the patient and I confirmed the diagnosis, immediately writing her a prescription for banana bread cupcakes. Needless to say, we filled that prescription right away. (Corny, I know. But I had to.)


I got the recipe from recipe zaar and I've used it multiple times already. It's titled "best ever banana cake ever" and it really is. I also added walnuts to the recipie which it doesn't call for, but I think was a pretty good addition.


You would think that the baking temperature of 275 degrees is abnormally low, but it works. That and putting them in the freezer as soon as they come out of the oven must do something to make these insanely moist and delicious. I'll look into the chemistry of it all later..

The recipie is for a 9 x 13 cake but I kept everything the same just putting them in cupcake pans. I believe the cook time was even the same (a lot slower than normal because of the low temperature). I would still do the toothpick check once in a while to make sure you don't overcook. If you want to do pretty piping with the icing let the cupcakes cool and put the cream cheese frosting in the fridge for a little. Or you can just spread it right on like I did, couldn't really wait. Just as delicious and garnished with a walnut, I think pretty too.


Great taste, great texture, saved some bananas from living their last moments out in a landfill... I'd say overall it was a pretty sucessful day.

Eat two and call me in the morning.
-your pre-med chef

Wednesday, July 22, 2009

pain doré


That's french toast in...well, French of course! French toast is a classic, it's easy to make, and it's perfect for a lazy Sunday morning (morning being 12:30 in the afternoon).

It's hard to go wrong with french toast but there are two things that I think are essential to get the most out of your toast.
1) Challah makes the best french toast, hands down.
2) Real maple syrup is 100x better than that fake stuff (sorry Auntie J.)

All that you need is:
  • sliced raisin challah (or plain, or chocolate chip, or other bread if you must)
  • 3 eggs
  • 1/3 cup of milk
  • 1 teaspoon pure vanilla extract
  • 1 tsp sugar
  • 1 tsp cinnamon
  • a pinch of salt

  1. Beat eggs in a large bowl
  2. Add milk to the eggs, mix together
  3. Add sugar, cinnamon, vanilla, and salt to the mixture
  4. Butter a large pan and set stove to high
  5. Dip the bread in the egg mixture, covering both sides, and place in pan
  6. Once pan is heated (you should hear the sizzling) lower the heat to medium-low
  7. Cook toast until browned on both sides
  8. As you take the toast off the pan, place the slices on plate in oven or somewhere it will stay warm until ready to be served
  9. When you've toasted your heart content, top with some fresh fruit, powdered sugar, or just some pure maple syrup, mmm...

you know the deal, eat two and call me in the a.m.

Saturday, July 4, 2009

Red White and Blue...Velvet!


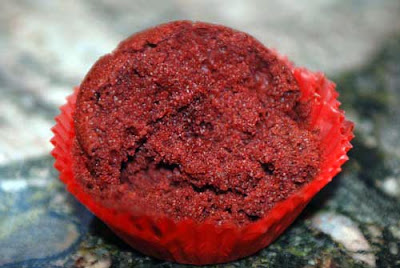
While Red Velvet has recently been quite the craze, I was never lured in. I figured it was just chocolate with red food coloring, and to be quite honest, I didn't get it. So until now I've passed. Until now. Then came the Fourth of July, a perfect excuse to not only bake, but to bake something, well...red. Let me say, I'm glad I did. I don't think there is a better way to celebrate the country that gave us corndogs and turducken than making something 233 times more appetizing. I now understand the fuss over this red velvet thing. I don't know how to explain it, or why it tastes different than an ordinary chocolate cupcake, but it's very different, and very mmm...

Red Velvet Cupcakes
  • 2 1/2 cups cake flour
  • 2 tablespoons unsweetened cocoa powder
  • 1 teaspoon salt
  • 1 1/2 cups vegetable oil
  • 1 1/2 cups sugar
  • 2 large eggs
  • 1 teaspoon pure vanilla extract
  • 1/2 teaspoon red gel paste food color
  • 1 cup buttermilk (or my milk + lemon trick)
  • 1 1/2 teaspoons baking soda
  • 2 teaspoons distilled white vinegar
If you can't find gel paste you can use the normal supermarket liquid variety, but you'll have to use a lot more. I bought a one ounce bottle of red liquid food coloring and used about 3/4, you can use as much as you want to achieve your desired red.


Cream Cheese Frosting
  • 1/2 cup (2 sticks) unsalted butter
  • 12 oz cream cheese
  • 1 lb (4 cups) confectioners sugar
  • 3/4 teaspoon pure vanilla extract

Since I clearly didn't know the first thing about red velvet, I got the recipe from Martha Stewart's new cupcake book which is just glorious, thanks Marthy!
  1. Preheat your oven to 350
  2. Whisk together cake flour, cocoa, and salt
  3. In a separate bowl, whisk oil and sugar together until combined
  4. Add flour mixture in three batches, alternating with two additions of buttermilk, whisking after each.
  5. Add eggs one at a time, beating after each.
  6. Mix in food color and vanilla
  7. Stir together baking soda and vinegar in a small bowl, it will foam (apparently this does something with the cocoa to bring out the red?)
  8. Add mixture to batter and stir for 10 seconds
  9. Put in your baking cups and cook for 20 minutes, rotating the trays once half way through.
While those are baking is a good time to make your frosting:
  1. Beat butter and cream cheese until fluffy
  2. Add confectioners sugar 1/2 cup at a time, beating after each addition
  3. Add vanilla, and whisk some more until smooth and combined.


Once they are cooled you can frost them. I went a little crazy and got some blue cake dust and white sugar pearls to decorate them with. Then they were sent on their way to a 4th of July party (a few staying home with me, naturally). Everybody loved the cupcakes, turning me from a red velvet skeptic into a red velvet enthusiast, who knew? Happy Birthday America!


Eat two and call me in the morning.
-your pre-med chef

Wednesday, June 3, 2009

chocolate chocolate chip banana bread

I should probably have titled this post chocolate chocolate chip banana bread disaster, because it really was. Ultimately though, the bread was delicious, so that would have been slightly misleading. Let me explain...


Yeah...that's what I meant by disaster. What happened was I put the loaf pan on top of an insulated baking sheet to keep the bottom of the bread from overcooking (good idea). Then when it came time to check if it was ready, I pulled the bread out by the baking sheet underneath the pan (bad idea). The uneven weight caused the loaf pan to slide gracefully off the baking sheet and onto the kitchen floor, oops.

So what did I do? I decided that instead of letting all this food go to waste, I would embrace the second law of thermodynamics and accept that the disorder of this universe is constantly increasing, and it just so happened in my kitchen. I slid the pan (that was obviously face down) onto the baking sheet, flipped it back right side up, scraped off the top layer, and put it back in the oven for a little to finish cooking/kill any germies i didn't scrape off.

In the end, it was good. It would have been a lot prettier had I not encountered that little mishap, but can't judge a book by it's cover, right?

So if you trust that this baby is good enough and have not been completely grossed out by the fact that part of this banana breads journey was on my floor.. then here's the recipe for disas...success!

Chocolate Chocolate Chip Banana Bread

  • 2 cups all-purpose flour
  • 1 cup cocoa powder

  • 1 1/2 teaspoons baking powder

  • 1/2 teaspoon salt

  • 1/4 teaspoon baking soda

  • 1 stick (1/2 cup) unsalted butter, at room temperature

  • 3/4 cup sugar

  • 1/2 cup packed light brown sugar

  • 2 large eggs

  • 3 ripe bananas, mashed

  • 3/4 cup buttermilk

  • 1/2 bag bittersweet chocolate chips (or as much as you please!)

Little Trick: If you don't have buttermilk on hand you can add 1 tablespoon of lemon juice for every cup of regular milk, and let sit for 10 minutes. This is what I did this time.

  1. Preheat your oven to 350 degrees F
  2. Sift flour, cocoa powder, baking soda, baking powder, and salt together in a bowl
  3. In a larger bowl use an electric mixer to beat the room temperature butter until soft
  4. Beat the brown and regular sugar into the butter until soft
  5. Add eggs, again beating until smooth
  6. With reduced speed, beat the mashed bananas into the mixture
  7. Add the dry ingredients into the mixture gradually (about 1/4 of it each time) mixing until they disappear into the batter.
  8. Add the buttermilk and mix thoroughly into the mixture
  9. Add in your chocolate chips (you can also add nuts if you like)
  10. Put in a greased 9x5 loaf pan, put the pan on top of an insulated baking sheet, and place in the oven for 30 minutes (this will keep the bottom from overcooking)
  11. After 30 minutes cover the top of the bread loosely with aluminum foil (this will keep the top from overcooking). Leave in for about another 40 minutes.
  12. Check to see if ready by sticking knife in center of bread and seeing if it comes out clean.
  13. Take out, NOT by pulling out the baking tray from underneath the loaf (for reasons already established) and let cool for about 20 minutes before running a knife around the edges of the pan and taking out the banana bread.
  14. Enjoy while still warm, gooey, and delicious.

See, in the end it came out quite good, despite the technical difficulties. I don't know if this picture fully conveys the chocolatey-ness and moistness of the bread, more like cake.

Banana bread is just the perfect thing to make when your bananas get all brown and too ripe, why throw them out when you can make this? Especially in summer when the transition seems to happen twice as fast. I guess that means I'll be baking twice as much banana bread. Mmm.. I'll leave it on that optimistic note.

Eat two and call me in the morning.
- your pre-med chef

Search Engine Submission - AddMe

Thursday, May 28, 2009

carrot cake cuppies with cream cheese frosting

Tomorrow is my boyfriends birthday. So naturally, it's a perfect excuse to bake something up. It was between red velvet and carrot. I didn't feel like getting all involved with red food coloring, so I went the more wholesome, natural, and (in my opinion) even more delicious route.


Let's see.. carrots, apples, raisins, walnuts...what is this, a granola bar?!
Not quite.

I told you I could convince you that breaking out those cupcake trays does the body good. But really, 2 cups of carrots, 2 apples, 1 cup of raisins.. what better way to have your fruits and veggies? So hurry up and get out your mixing bowl, doctors orders
.


Carrot Cake
  • 2 cups all-purpose flour
  • 2 teaspoons ground cinnamon
  • 1/2 teaspoon salt
  • 1 1/2 teaspoons baking soda
  • 1 cup granulated white sugar
  • 4 large eggs
  • 1 cup canola oil
  • 2 cups finely grated raw carrots
  • 1 cup grated apples
  • 1/2 cup of nuts (i chose walnuts but pecans could work too)
  • 1 cup of raisins
Note: You can use applesauce instead of dealing with putting the apples in the food processor. I personally try to use all whole foods, weeding out as many preservatives and chemicals as possible. Hey, if I'm having sugar, I want the real deal.


Cream Cheese Frosting

  • 1/2 cup unsalted butter (at room temperature)
  • 8 ounces of cream cheese (room temperature as well)
  • 2-3 1/2 cups confectioners (powdered) sugar
  • 1 teaspoon pure vanilla extract
Note: 2 cups of sugar is enough to get the right taste and consistency of cream cheese frosting, but the more you add, the "thicker" (for lack of a better word) the frosting gets. More sugar makes it prettier for decorating, it seems more smooth and is less likely to start melting and drooping. I used two this time.

Now that you're all prepared.. let's make some cake.
  1. Preheat your oven to 350 degrees F.
  2. In a separate bowl, whisk the flour, baking soda, salt, and cinnamon together.
  3. In a larger bowl whisk the sugar, eggs, and oil until thickened.
  4. Gradually mix the flour mixture into the sugary mixture until smooth.
  5. Fold grated carrots, apples, raisins, and walnuts into the mixture.
  6. Put in your cupcake tray and bake for about 20 minutes or until the toothpick comes out clean.
  7. Let stand on cooling rack until completely cooled.
While your pretty (and so nutritious) cuppies are baking, why not make the icing!


  1. Whisk together butter and cream cheese until smooth.
  2. Add the powdered sugar into the mix gradually, whisking until light and fluffy.
  3. Add vanilla extract, whisk it all together some more.
  4. Scoop some out with your finger and taste, delish.
Once your cupcakes are cooled off, you can go ahead and ice them. I like to actually put mine in the refrigerator for a little before icing them so that the frosting doesn't melt. I finished it off by garnishing with some chopped walnuts.

Then you should probably go ahead and eat one. Or two.

These came out great, so moist and cakey, and the sweet yet slightly tart cream cheese frosting complimented it perfectly. A classic.


So Happy Birthday, Nate! Sorry I started to dig into the cupcakes before I gave them to you, I had to taste them to make sure they weren't, you know... poison.

May the beta carotene, calcium, fiber, omega 3's, and vitamins (A. B,C and E) that are packed in these adorable little cups of joy bring you a healthy and happy birthday and many more to come.

Eat two and call me in the morning.
- your pre-med chef